An approval process is a form of Salesforce automation that allows for records to require approval before moving forward through an operation. Approval processes in Salesforce can be used in an almost limitless number of ways. Any time a person in your organization needs to check a record for any reason, automating that task helps save time and creates consistent processes.
From granting a free trial to getting sign-off on something from legal, defined approval processes take the guesswork out of operations and put an end to tedious, time-consuming manual tasks and data checks. Without defined approval processes, items that should be approved can slip through the cracks, causing your company to make embarrassing mistakes and work inefficiently.
Let’s look at the types of approval processes companies can build in Salesforce.
How Are Approval Processes Used In Salesforce?
You can use approval processes for any business process where a person needs to manually check a record before an action takes place.
Some of the common uses for approval processes in Salesforce include actions like:
- granting a free trial
- approving an enterprise plan
- approving a discount
- approving a change to a critical account record
- reassigning an enterprise lead
- sending an offer
- getting sign-off from legal
However, you can build approval processes for a wide range of complex business cases. You’re limited only by your creativity. The Salesforce Approval Process Builder helps to make these processes easier to understand, even for less advanced administrators.
Benefits of Salesforce Approval Processes
Building your operations approval processes directly into Salesforce CRM has several benefits. Generally, ensuring that your work takes place where your most critical data is stored helps to keep your database up to date. It also gives your employees peace of mind when using the data.
Some of the benefits of building approval processes in Salesforce include:
- improved accuracy of important approval data
- compliance tasks that are always completed
- defined processes that outlast employees
- continual improvement of processes over time
- increased organizational oversight and control
- process transparency for employees
Approvals of work, deliverables, and information are constantly happening at all levels of your company. However, many of those approval processes are undefined or occur through email, making it challenging to analyze them and spot issues. Salesforce approval processes give you the opportunity to define and monitor approvals effectively.
|
Related articles Salesforce Flows Cheat Sheet: Guide & Examples A Guide to Apex Triggers in Salesforce Salesforce and ABM - Associating Leads and Contacts to Accounts |
Need-to-Know Salesforce Approval Process Tips
When working with Salesforce approval processes, there are several nuances that you need to be aware of.
Need-to-know facts and tips about Salesforce approvals include:
- Once an approval process is activated, you can’t add steps, delete steps, or change the order.
- Approval processes have a limit of 30 steps.
- An approval process may have up to 25 assigned approvers.
- There can only be one active approval process per object.
- You cannot delete an active approval process. Instead, you must make it inactive and remove records stuck in the queue before deleting the approval process.
- Approval process criteria require documentation. When approval criteria aren’t met, Salesforce displays a standard error message that does not provide much information.
- Records are locked to users once submitted for approval. A record must either be approved or rejected for it to be unlocked.
- Field updates that are executed as approval actions don’t trigger workflow rules.
With these considerations in mind, you can build your process with confidence.
Step-By-Step Custom Approval Process Example: Build a Discount
Building an approval process is a straightforward process, particularly when using Salesforce’s Setup Wizard.
Start by defining the approval process that you would like to build to limit mistakes. Then you can build the approval process and add submitters, approvers, and notifications to ensure that all required stakeholders are included.
Step 1: Defining Your Custom Approval Process
Before you can build your approval process, you have to answer some critical questions and define what your approval process will look like.
Some of the questions that you should ask yourself before you begin building include:
- Who can submit a record for approval?
- Who can approve the submitted records?
- When should a record be submitted? What happens just before submission?
- What fields require data to finish the approval?
- Who can edit or unlock a record while it’s in the approval queue?
- How should the approvers be notified of new items in the queue?
- What information should be included in the notification?
- If there are multiple people who can approve a record, do they all need to sign off, or only one person?
- How should the record submitter be notified of approval or rejection?
With these questions answered, you can then begin to plan and diagram the flow for your approval process.
Step 2: Build the Approval Process
Creating an approval process is simple. Using Salesforce’s Setup Wizard, you go through the process step-by-step, entering relevant details as you go.
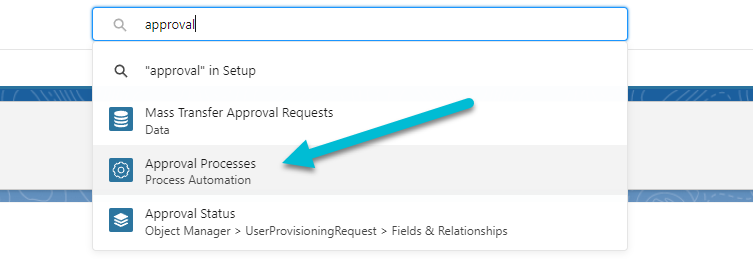
Type “approval” into the quick search box, then select Approval Processes.
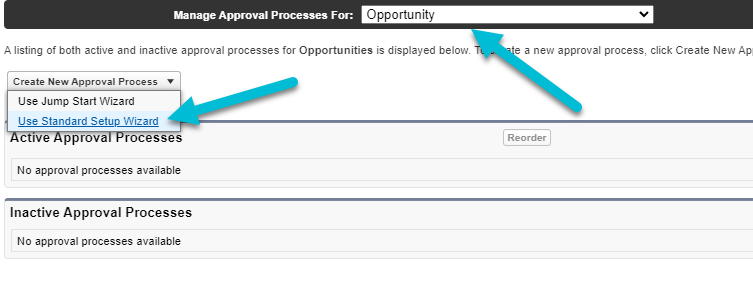
Here, you can choose to manage approval processes for opportunities, and use the Standard Setup Wizard to create the approval process. Once you select the Standard Setup Wizard, setup will begin.
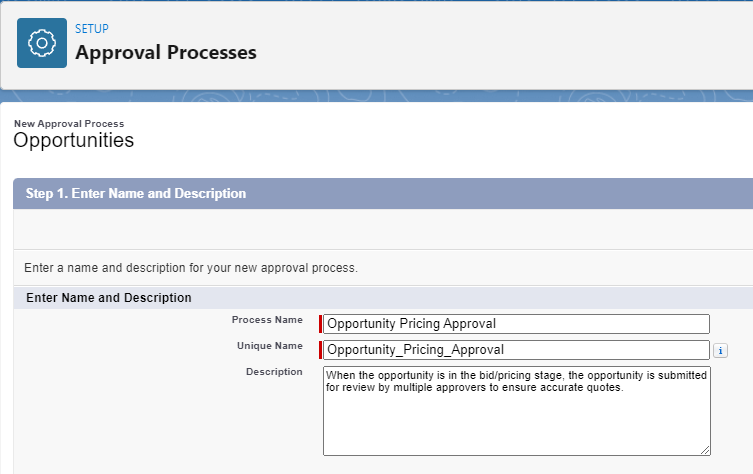
You’ll be taken to a screen where you can name the approval process and provide a brief description of what will happen when the approval process runs.
Then, click Next.
You’ll be taken to a screen where you can define the entry criteria for the approval process. In our example, any time that an opportunity enters the Proposal/Price Quote stage, the opportunity must be approved to ensure the quote is accurate before moving forward.
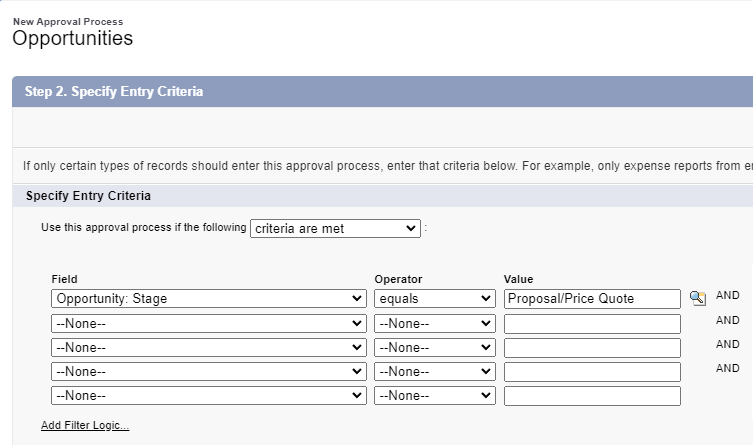
For more advanced approval processes, you can add multiple field filters and filter logic. For example, maybe you wanted only opportunities above a certain dollar amount to be subjected to this approval process. You could add a second field, “Opportunity: Amount,” to this list. Then, you can use the filter logic to tell Salesforce whether to look for all conditions, or specific combinations of conditions.
For example, initiate the approval process if:
- Entry Criteria 1 AND Entry Criteria 2 are met
- Entry Criteria 1 OR Entry Criteria 2 And Entry Criteria 3 are met
- Entry Criteria 1 is met, AND Entry Criteria 2 OR Entry Criteria 3 are met
This allows you to provide multiple potential pathways for an opportunity to enter the approval process based on the criteria you set.
When complete, click Next.
In the next screen, you can tell Salesforce how the next automated approver is determined, as well as who can edit the records during the approval process.
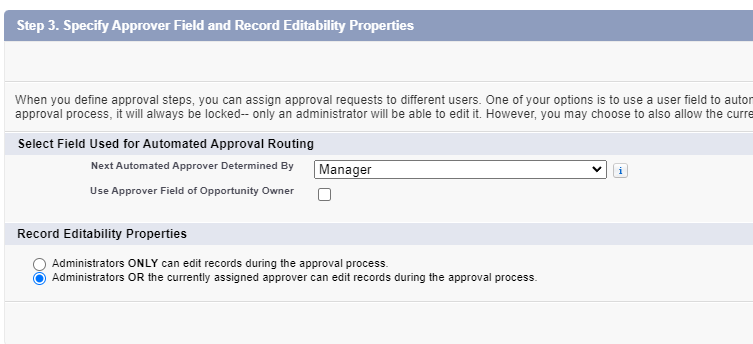
By selecting Manager in the dropdown above, we’re indicating that the Manager listed on the submitter’s user profile will be used.
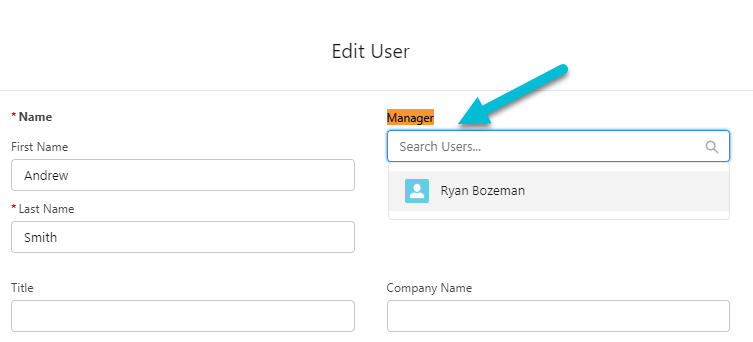
Additionally, you can use the Delegated Approver field to designate someone that can approve records on behalf of the assigned approvers. This is important when approvers are on vacation or out sick, or to otherwise ensure that approval tasks continue to move through the queue despite hangups.
Step 3: Notification Templates
Then, you can select the email notification template that will be sent to the assigned approver once the record has been submitted.

Click the Next button to configure your approval page layout.
Step 4: Configure your Approval Page Layout
Here, you can add fields to the approval page layout. Add fields from the Available Fields column to the Selected Fields column.
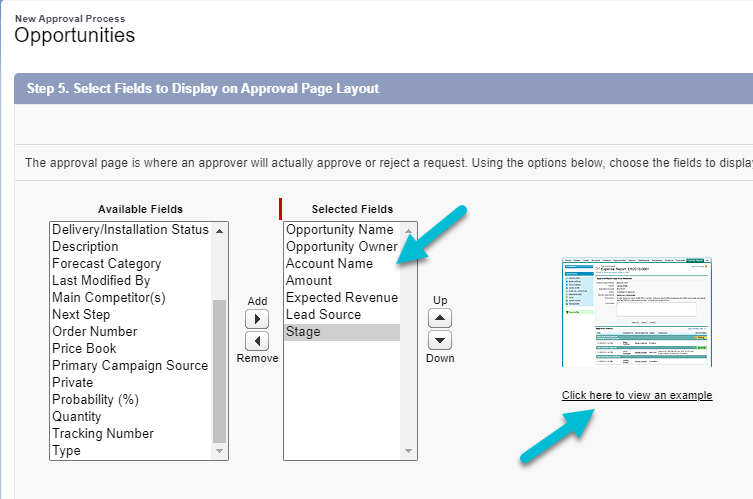
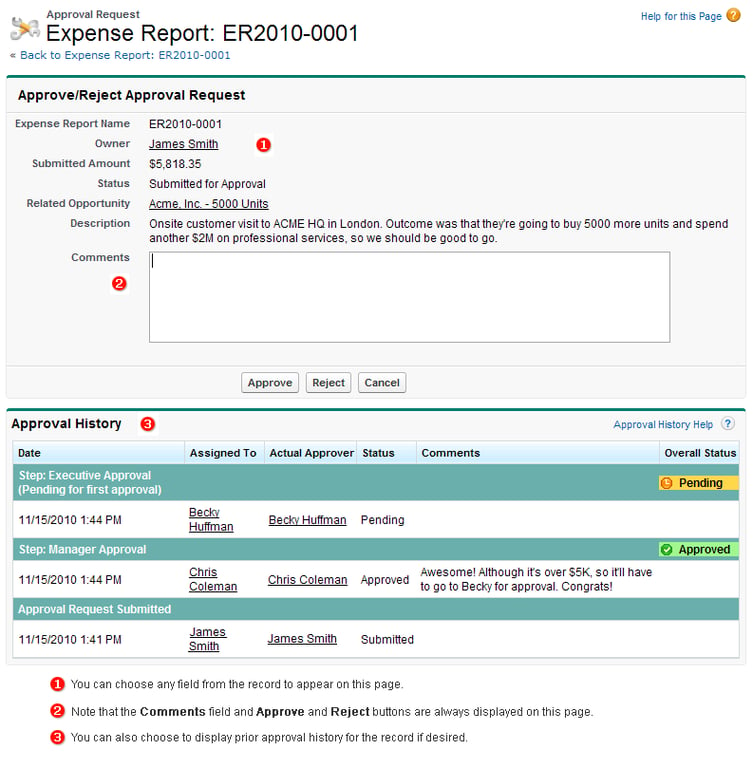
You can preview your approval page layout by clicking the example. This will generate an image showing you what an example approval request would look like based on the fields you chose.
When finished, click the Next button to add initial submitters for this approval process.
Step 5: Add Initial Submitters
Here, we tell Salesforce which users will be able to submit records for approval.
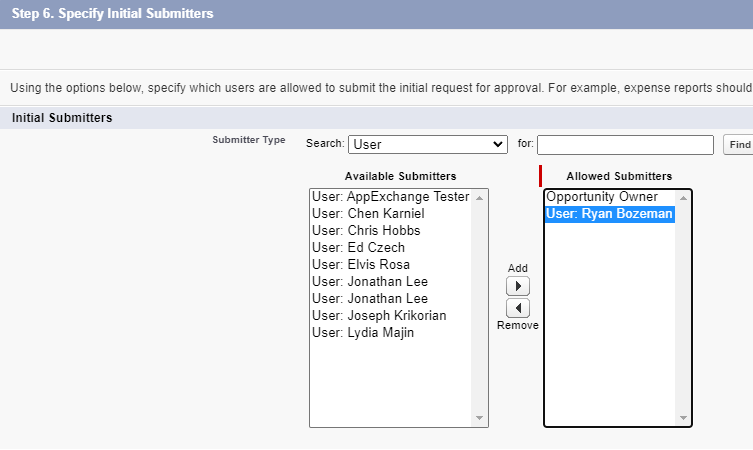
You can filter available users by searching for them. You can also search for roles, groups, owners, and creators. When done, click the Save button. You’ll be directed to the approval process overview screen.
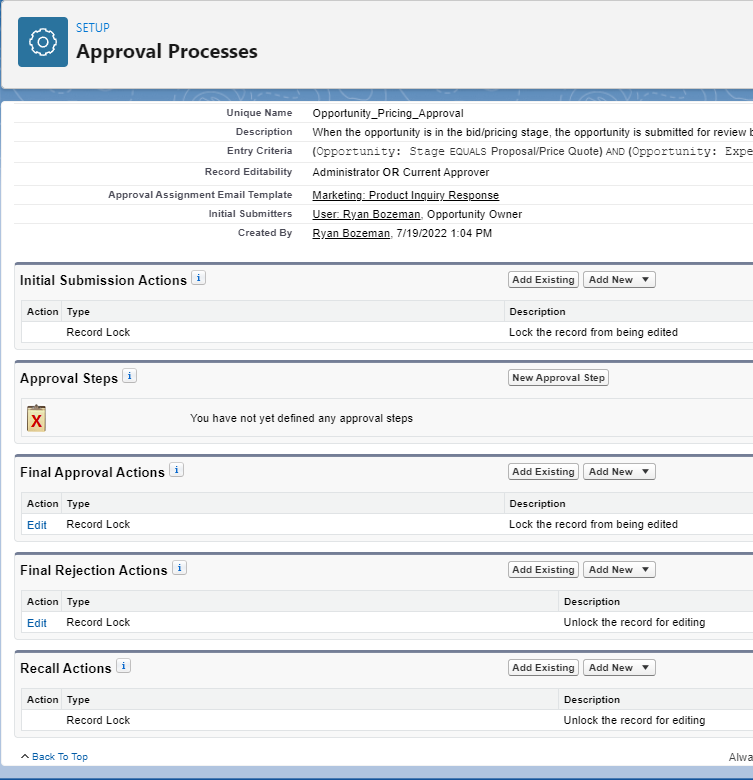
You can add additional steps and actions to further flesh out your approval processes and improve them over time.
How Quality Data Facilitates Approval Processes and Operations
Approval processes are a critical part of any company’s operations. Using Salesforce’s approval processes function, you can define those processes, ensure compliance, and automate many manual tasks. This is critical for freeing your teams up to focus on the big-picture concepts that fuel growth. But automation is only as effective as the data that powers it. Without quality data, the approval processes that you launch could be ineffective or run in unexpected ways.
Using the example of requiring approvals for opportunities in the pricing/quote stage, one data issue that can cause major issues is duplicate records. Duplicate leads, contacts, accounts, and opportunities create problems and confusion for stakeholders during the approval process.
This is just one example, but it applies to any approval process or automation created in Salesforce. Any form of automation relies on the data you collect, so if your data quality is poor, your automation won't work as intended. And for each data field, there may be requirements for cleanliness and standardization for your approval processes to work properly.
Without reliably clean data, this means that you will have to create additional data management tasks. These tasks will impact how quickly records can get into your approval queue and ultimately be approved.
Companies often perform data updates as needed. These ad hoc updates may be completed manually, using Excel, using internal development resources, or by hiring outside consultants. However, often, investing in data management software provides a better balance in time and cost savings.
How Insycle Enables Effective Approval Processes in Salesforce
When building out Salesforce approval processes, a data management solution is a smart investment. It ensures that your approval processes run as smoothly as possible, minimizing data-related hangups and mistakes.
Insycle is a complete data management solution for approval processes, helping companies to identify and fix common CRM data issues, while also allowing you to build custom templates to address issues that are unique to your organization.
Insycle can help you:
- merge duplicate records
- standardize and format
- link leads, contacts, accounts, and deals
- declutter and purge bad data
- import or compare data using CSVs
- bulk-update, delete, and assign
- explore and analyze your data
- streamline data corrections
- collaborate on data management
With clean data, you can implement Salesforce approval processes and other automation with confidence, knowing that data cleanliness issues won’t get in the way.
Data Fuels Salesforce Approval Processes
Insycle makes a natural pairing with Salesforce approval processes, helping companies ensure that their approvals run smoothly and produce accurate outcomes.
But Insycle isn’t just for approvals. It’s a complete data management tool helping companies analyze, understand, identify, fix, and collaborate on data issues across their organization.
Insycle enables operations teams to fix CRM data quality issues in bulk and automate their most important data maintenance processes. Without Insycle, the cost of bad data is a major blind spot for Salesforce companies and a roadblock for execution by their teams.
Want to learn more about how Insycle can help improve Salesforce approval processes? Learn more about how Insycle streamlines Salesforce data management, enabling your teams to avoid redundant data maintenance tasks and focus on big-picture opportunities.


